SNIPS BY KELLY

Wednesday, February 17, 2016

EARLY CHILDHOOD/PRESCHOOL LANGUAGE LESSON: CLOTHING-Silhouette in Education

EARLY CHILDHOOD/PRESCHOOL LANGUAGE LESSON: CLOTHING

I love being a Speech Pathologist.  I love working in Early Childhood Education.  I love the Silhouette and crafting.  So why not combine all the loves of my life?  The Silhouette isn't just awesome for the crafty extras.  It is a great support in the classroom as well!  Tonight I am sharing an Early Childhood Lesson in "clothing".  I used the silhouette to create articles of clothing to use in a variety of vocabulary, turn taking, circle time and table top activities.
 
 
Create a "Clothesline" with articles of clothing you want the children to be able to identify and name.  Have them pick out articles of clothing from a hat or sock and use clothespins or paper clips to match and clip them to the same article of clothing on the clothesline.

 
For a table top activity, allow the children to "dress" their person in any attire they like.  You can discuss seasons, weather and occasions in which you might wear specific articles of clothing.  Let them draw the faces, mix and match the clothing, and put buttons of googly eyes on them. 

 
Adhere articles of clothing onto popsicle sticks.  Place them in a little "laundry basket".  Have the children take turns pulling an item out. They can name them, match them to each other, or sing clothing songs and insert the article of clothing they chose.  You can give each child a sock and play a game in which they have to find the child in the class that has their "match".

 
These are little sock name tags.  For early learners you can talk about names and how everyone has one and have them practice saying their first and last names.
 
Songs:
This is the way we put on our.....
(To the tune of "Here We Go 'Round the Mulberry Bush")
This is the way we put on our pants, put on our pants, put on pants
This is the way we put on pants
so we can go out and play!
(pretend to put on the article of clothing and move to the next article of clothing and so on!)
 
Kelly wore her pink pants:
Kelly wore her pink pants, pink pants, pink pants
Kelly wore her pink pants to Head Start today!
(substitute other children's names with other articles of clothing)


CONSTRUCTION ZONE BIRTHDAY PARTY and CAKE

CONSTRUCTION ZONE BIRTHDAY PARTY and CAKE
It is pretty clear with me that I LOVE all things paper and paper crafty.  Cakes and treats I have not mastered and if I am the master of these, I am called the master of disaster!  I admire those talented people out there that can decorate cupcakes and cakes and make all kinds of things look amazing and taste equally so! This is not me! That is why I LOVE the construction cake!  It is the mess that matters and the more crumbly and broken it looks the better!!
 
I had so much fun making the hat, party favors and cake for our Grandson's 5th birthday!  Of course the tags, gift box decorations, hat, construction zone signs are all Silhouette cut files. For a complete list of files and the creators, see the end of this post.  For anyone following me.....I love my Silhouette!  If you are even CONSIDERING getting one....GET IT! You will not regret how much easier it makes your life!
 
 
For the cake:  Make a cake of your choice and for height, I would make two of whatever cake (round, rectangular, square) you make.  I made two layers of round  cake and then cut it in half.  I stood one half on edge to make a hill and laid the other down sloping in front of it.  I used crushed Oreos, chocolate bits, malted milk balls for boulders, heath bits (for lighter sand or gravel)  and of course plastic construction equipment to decorate.  If you are short on time one could purchase a round layer cake from a local grocery store (GASP) and make this look just as awesome! It's all about making it a construction zone!
 
 
 Easiest party favors ever, fill your bags with boulders (malted milk balls), add a small piece of construction equipment and a tag!  TADA! 
Here is a list of Silhouette Cut files I used:
Snapdragon Snippets:  "3D Kids Hard Hat Party Hat", "3D Hazard Place Card and Tag", "Backhoe Birthday numbers", Tags 3 Large Construction Theme"
Daley Designs:  "Detour Ahead Sign", "Road Close Ahead Sign
Hero Arts:  Road


Tuesday, February 16, 2016

CHARLOTTE: Close To My Heart

CHARLOTTE:  Close To My Heart

Wedding Scrapbook Layouts

I am trying to get some wedding photos scrapped before my 25th Wedding Anniversary! This is a joke since we were just married this past summer in Telluride, Colorado!  What a beautiful place.   Some things are worth the wait! One advantage to getting married late in life, is that theoretically I will have more time to scrap my wedding photos. Right?!?  I am loving this Charlotte line from CTMH.  So many options from soft to bold.  Charlotte papers and workshops are still available through August 2016.  Just click on my link here if you want to check out CTMH and get scrapping!  Kelly's Close To My Heart


Sunday, February 14, 2016

ST. PATRICKS DAY POT O' GOLD TREAT BAGS

ST. PATRICKS DAY POT O' GOLD TREAT BAGS

I am still catching up the blog on a few past treats and holidays and thought I might as well post some treats from last St. Patrick's Day since it is coming up! I am usually behind so maybe getting this posted ahead of time can be me turning over a new leaf!! We usually have quite a problem around here with the leprechauns and their mischief on St. Patrick's Day.  We have found if we leave treats for them before midnight the night before, our milk doesn't turn green nor does the toilet bowl water! 

 This was the simplest treat bag ever as you can see.  Simply add rainbow colored licorice with gold foiled Rolos.  Add any tag you wish.  I used a Polka Dot shamrock cut file by Hero Arts and a Lucky You Mini Theme cut file by Echo Park!  Unfortunately, the leprechauns still struck! They pulled all of our underwear out of our dresser drawers and strung it throughout the house!  Be careful out there and remember to wear green!


Saturday, February 13, 2016

DUMP TRUCK VALENTINES: CTMH URBAN

DUMP TRUCK VALENTINES

Close To My Heart Urban

 
 Who says love has to be pink?  We have 4 Granddaughters in our lives and only 1 Grandson so far!  Poor kid is all boy but has had his fair share of "girl stuff"!  Today I made boy valentines for him using Close To My Heart "Urban" B & T Duos paper, Slate and Saffron card stock and their blue dots enamel glitter gems for the wheel hubs. 
 
I used a "Sweet Afton" truck box Silhouette cut file and "Kenzy Daley" road signs along with Close To My Heart Urban sticker assortment "awesome ahead". I used my Silhouette sketch pens to write on the valentines and chose a messy boy font.

To add an extra dimension and quick special touch I used the Close To My Heart chevron embossing folder on the truck tires to give them that beveled "wheel" look".  I love my chevron embossing folder and use it for so many things!
 
All that's left is to fill the truck with some 'sweet' love!


Thursday, February 11, 2016

VALENTINE WINDOW TREAT BOX AND OWL

VALENTINE WINDOW TREAT BOX AND OWL

Lori Whitlock Cut Files


With just 3 days left until Valentines Day, I am cutting it close as usual!  I have so many cute Valentines I want to make and so little time!  Once again, Lori Whitlock saves the day. I just visited her website and blog:  www.loriwhitlock.com and she was having a blog hop.  She has so many great designers and I used their ideas!   I used her "3D Heart Cracker Box" cut file as well as her "Lip Balm Owl", "Valentine Pencil Hearts", and  "Valentine Pencil Be Mine". For paper,   I used Close To My Heart Enchanted double sided card stock and I am in love with the raised embossed look and feel of this paper.  I also used some scraps of "Simple Stories-Hugs and Kisses". 
 
One question I had for Lori Whitlock during the blog hop was what she uses for her "clear windows" in those type of projects.  She shared that she uses the old fashioned transparency film.  I found some at an office supply store and boy was this a helpful hint!  I was able to cut the oval windows from the transparency film right on my silhouette.  I cut the "face" of the owls out of Kraft Paper and then embossed them with the Close To My Heart chevron embossing folder.  I love the dimension the embossing folders add!  These were very fun and simple!

Wednesday, February 10, 2016

VALENTINE: LIP BALM ROBOT

LIP BALM ROBOT VALENTINE


I had fun making these cute little robot lip balm holders for Valentine's Day.  The robots are a Lori Whitlock Silhouette cut file:  lip balm robot and the flags were also a Silhouette cut file titled "Valentine's Flags" by Patty Young.  There are so many colors and flavors of the EOS lip balm now and these two were yummy smelling!  They are "passion fruit" and "honey suckle".  I am hoping a I have a couple Granddaughter's that will enjoy the robots and the sweet smelling lips!

3 INGREDIENT PEANUT BUTTER BITES

3 INGREDIENT PEANUT BUTTER BITES
 
So my disclaimer again?  Like I have said before, I am not going to fight with people out there about what is clean eating, healthy eating, and not!  If you googled "What is the healthiest cereal?", I can guarantee there are people out there ready to fight and argue with you about fiber, refined sugar, natural sugar, whole grains, wheat, and hydrogenated somethings or others!!!  I don't ever book "cereal" as being clean eating simply why?  Because it's processed!  Clean eating means avoiding processed foods! Now having said that, there are recipes I do use that are not 100% clean eating but are healthier treats!  So depending on where you stand....maybe you have a cereal that agrees with your life style, perhaps Barbara's Original Puffins, Kashi, or some Nature Path cereal you use then use it!  If you don't agree that cereal should be in your diet, then don't use it!  This recipe is a "lesser of the evils" recipe for me as I use 1 cup natural peanut butter (ingredients should say PEANUTS...PERIOD!), 1 cup natural honey, and 4-5 cups of  the healthiest cereal of my choice!
 
I do use Barbara's Puffins ( I love Barbara’s Cereals – not only are they crunchy, tasty and hearty, they contain NO artificial colors, flavors, preservatives, refined white sugar or hydrogenated oils. The Original Puffins have 3/4 cup has 90 calories, 5g fiber, 5g sugar and 2g protein) or Kashi's Heart to Heart O's or YES...even plain old Cheerios (has to be the original as the newer versions are a bit sugared up) that has only 110 calories, 3g fiber, 1g sugar, and 3g protein.
 
 
One of the biggest complaints in our area is availability and cost.  People have difficulty finding health foods stores that are convenient and close and when they do, they are more expensive.  I will say that often you can find these types of products online for more reasonable and also, stores are beginning to carry more and more health conscious items.  I do not buy cereal in our house as a regular staple but on occasion I will for special recipes and it is a crazy ingredient game.  A good general rule of thumb that I learned (painfully) is that your cereals should be: 
 
  • No more than 150 calories per 3/4-1 cup serving
  • Less than 5-6g of sugar is ideal
  • At least 4-5g fiber per serving
  • No dried fruit
  • The first few ingredients should say “whole grain” or “bran” or “whole wheat”
  • At least 3g protein per serving
  • No weird ingredients / preservatives that you can’t pronounce

  • Back to the cereal bites...the man of the house loves a little something sweet after his meals.  Although I don't claim this particular recipe to be 100% clean, I have no concerns about him having a cereal bite!  If you don't believe me that they are a healthier alternative, just compare them to a candy bar!

    If you find something picky eaters love that is 90% or more healthier than normal, then my philosophy is go for it!!


    Tuesday, February 9, 2016

    VALENTINE CHALKBOARD PAINT MASON JAR

    VALENTINE CHALKBOARD PAINT MASON JARS

    The chalk board paint on the mason jars allows you to doodle, write, or design anything you want on the jar with a chalk marker.


    First I cut the hearts out of silhouette sticker paper and adhered to jars.


    Paint jars with at least 2 coats of chalk board paint.  I used spray and I would not recommend this as it was drippy and uneven.  I would use a brush on if I had to do it over again.


    Let dry completely. I had to sand some bumpy spots due to the  "dripping" I talked about above.

     
    Peel off the adhesive hearts.


    Decorate with a chalk marker, ribbon, or anything you wish.  I painted small red dots around the hearts and wrote on them randomly with the chalk marker.
     
     
    Fill with your favorite treats!

    PAJAMAS AND PANCAKE BIRTHDAY PARTY

    PAJAMAS AND PANCAKES

    My Granddaughter's 2nd birthday was "Pajamas and Pancakes"!  It was a very relaxed birthday party in which all the guests were encouraged to come in their pajamas.  It was a breakfast party and who doesn't love breakfast??  I used several Lori Whitlock cut files including her: hand mixer shaped card, A2 Cook's Apron Card for the invitations (written on with Silhouette pens), the 3d Apron favor box,.  I used a Silhouette stand up mixer card.    These are so fun and I love the little utensils! 


    WELCOME!

    WELCOME TO SNIPS BY KELLY

    Welcome fellow papercrafters! Come in and find all things Close To My Heart where you can find the best coordinating papercrafting supplies, custom workshops including card making, scrapbooking, precut and DIY! I also offer consultant cutguides that can be purchased by my fellow consultants.  Memory keeping and items made by hand from the heart are becoming something of the past.  It is so important that we "tell our story" for our Children, Grandchildren and future generations.  I hope you find some wonderful tools here that help you tell your own story to preserve it forever.   Happy Scrapping!

    KELLY

    Monday, February 8, 2016

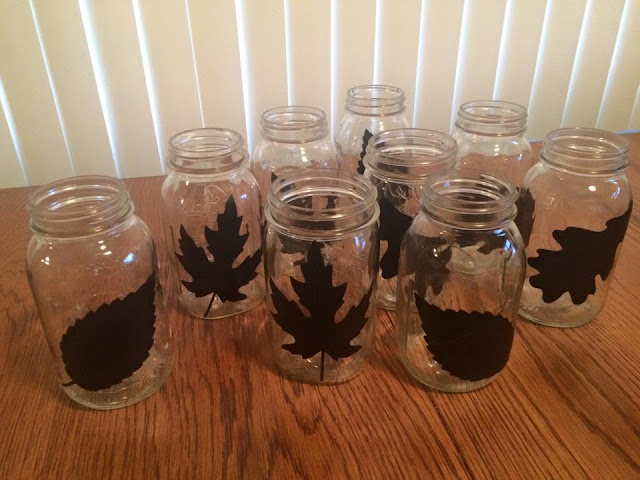
    FALL LEAF MASON JAR CANDLES

    FALL MASON JAR CANDLES

     I had some left over milk paint to use up and found yet another mason jar idea on Pinterest!  I can only imagine how mason jars went from a collection of clutter in your basement to a valued find practically overnight!  They have become so popular as of late for so many new purposes.  For this project I cut leaves out of my Silhouette (or use your Cricut if you are a Cricut user!) in vinyl. Adhere them how you want on your jars. Paint with 2 coats of milk paint. I used mustard, barn red, and tavern green. Peel off the vinyl after the paint dries and add popcorn, beans, rice or whatever fill you want and an LED candle. I have also seen this done by using real leaves and modge podge if you don't have a vinyl cutter. Be careful when you put your leaves on your jars to avoid the area of the jar that has raised writing as it will make your vinyl bubble and the paint seep.


    OLD WINDOW FRAME PROJECT: Love Story

    EVERY LOVE STORY IS BEAUTIFUL BUT OURS IS MY FAVORITE

    I love old wood and old windows.  I really love doing projects with these types of things because they can be imperfect and actually.....you want them to look imperfect and I am great at imperfect!!! I wanted to do the window pane project with just a weathered look but that will have to be my next project because I also wanted to do one with gold and cream hues. So for this one I used a 2 step crackle paint by Valspar. Clean the part you want to paint. Spray several coats of Step 1 base coat with about an hour in between.  After this is dry (but not longer than 48 hours) spray step 2 top crackle coat, use several coats depending on the types of cracks you want. I used silhouette gold foil for the saying and just added some do-dads like pearls, gold buttons and flowers and kept it simple. I used clear photo corners on the pictures so I can easily change them out. You can see them a little bit if you are up really close but not when it's on the wall so it's up to you if you want to use something else. Then the biggest job is to sweet talk the man of the house to put the hooks on it in the back!


     Clean up your window
     
     
     Cover the window panes


    Apply the base coat


    Apply first coat of crackle-let dry at least 24 hours but no more than 48
     
     
    Apply second coat of crackle


    Remove the paper and decorate!


    Gnomes for Spring 10-Page Workshop

     Gnomes for Spring  10-Page Workshop For Gnome lovers everywhere--these little spring gnomes will make you swoon!  It has been a long time c...